Olympus microscopes and photomicrographic equipment
OM-Mount Photomicro Adapter L
Introduction
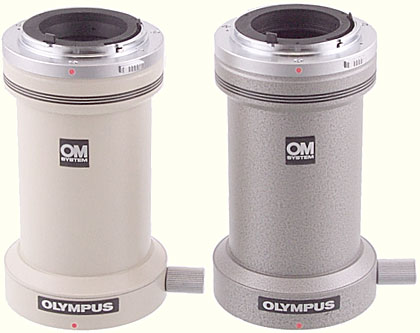
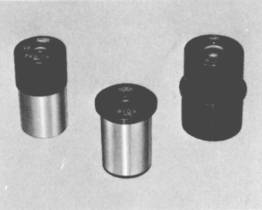
Cream and grey versions of the Olympus OM Photomicro Adapter L
The OM-Mount Photomicro Adapter L was designed to attach an Olympus OM or SC 35 Type 12 camera body to an Olympus compound microscope or stereo microscope, either directly or via one or more additional adapters. Any OM body can be attached, but for photomicrography the 1-12 focusing screen is almost essential, and so the fixed-screen bodies are not suitable. With a simple adapter, a Canon EOS digital SLR can be used instead of an OM body. The top of the Adapter has the same fitting as the rear of a lens, and attaches to the camera body in the normal way. Some of the Olympus microscope literature refers to this item as the Photomicro adapter MOM-L.
 |
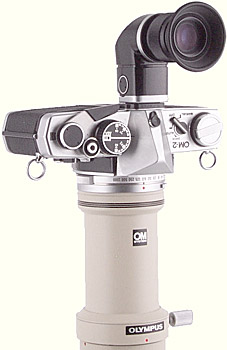 |
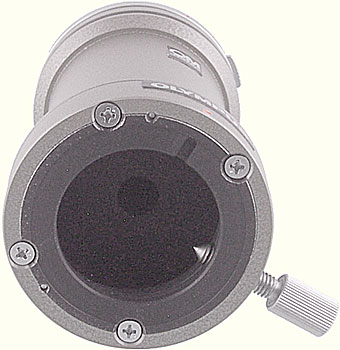
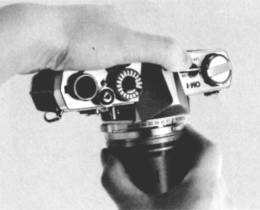
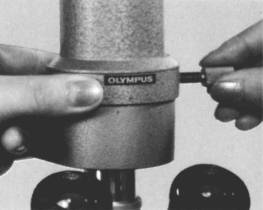
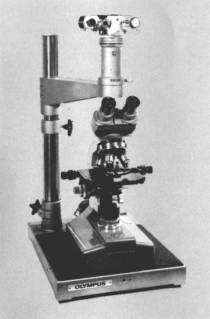
| Base of the Olympus OM Photomicro Adapter L | Photomicro Adapter L with OM-2 on an Olympus BH2-TR30 trinocular head |
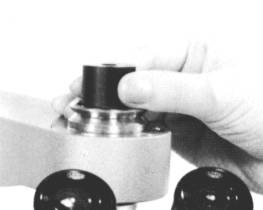
The bottom of the Adapter is intended to clamp on to the standard Olympus circular dovetail fitting for attaching cameras to microscopes. This dovetail fitting is found on some Olympus microscopes, on some Olympus trinocular heads and photo tubes, and on the eyepiece adapters. The photo eyepieces fit inside the circular dovetail.
| Microscope | Adapter |
|---|---|
| Olympus IMT-2 (inverted) or BH-2 (with BH2-TR30, BH2-SWTR30 or BH2-TTR trinocular head) |
direct |
| Olympus CK2 (inverted) or CH-2 (with BH-TR45-W trinocular head) |
Eyepiece Adapter PM-ADF |
| Olympus CK40 & CK40M (inverted) or CH40 (with CH3-TR45 trinocular head) |
Eyepiece Adapter PM-ADF |
| Olympus IM (inverted) or BH (with BH-TR45 trinocular head) |
Eyepiece Adapter PM-ADF |
| Olympus IMT-2 (inverted) or Olympus VANOX | direct |
| Olympus BX45 (with U-ETR3 or U-TR30-2 trinocular head) |
U-SPT single port tube or U-DPT double port tube |
| Olympus BX41, BX51 or BX61 (with U-ETR3, U-SWETR, U-TR30-2 or U-SWTR-2 trinocular head) |
U-SPT single port tube or U-DPT double port tube |
| Olympus CX41 (with U-CTR30-2 trinocular head) |
U-SPT single port tube or U-DPT double port tube |
| Olympus SZH | SZH-PT photo tube |
| Olympus SZ4045 TRPT, SZ6045 TRPT or SZ1145 TRPT (most trinocular models have the SZ-CTV C-mount adapter, which is interchangeable with the SZ-PT) |
SZ-PT photo tube |
| Olympus SZX7, SZX9 or SZX12 (with SZX-TR30 trinocular head) |
U-SPT single port tube |
| Olympus SZ-III-Tr (vertical monocular tube) |
Eyepiece Adapter PM-ADF |
| Olympus JM-Tr or X-Tr (vertical monocular tube) |
Eyepiece Adapter PM-ADP |
| Standard monocular tube | Eyepiece Adapter PM-ADF or PM-ADP |
| Standard binocular tube | Eyepiece Adapter PM-ADG or PM-ADG-3 |
| Base of Adapter L to film/sensor plane | 151.2 mm |
|---|---|
| Base of Adapter L to OM body mount | 105.2 mm |
| Base of NFK top section to film/sensor plane | 150.0 mm |
| Base of NFK top section to OM body mount | 104.0 mm |
| Weight (cream version) | 240 gm |
| Weight (grey version) | 241 gm |
| Microscope ref. | MOM-L |
| Olympus no. | 7-C545 |
| US catalog no. | 105-036 |
| Introduced | 1972 |
| Discontinued | 2003 |
Eyepieces
Olympus has made at least 4 ranges of photographic eyepieces, each suited to different types of objective.
The following table provides a guide for matching the eyepieces and objectives for compound microscopes.
| Eyepieces | Objectives | Adapter |
|---|---|---|
| PE range | UIS/UIS2 infinity corrected (standard on BX, CX and IX) | U-SPT or U-DPT |
| NFK range | LB long barrel, 45 mm parfocal (standard on BH-2, CH-2, CH40, CK2, CK40 and IMT-2) | PM-ADF |
| FK range | older, 36.65 mm parfocal (standard on BH, E & F, K, G & H, MF & N, CK, IM, FLM, and POM & POS) | PM-ADF |
| P range | other | PM-ADP |
The following table provides a guide for matching the eyepieces with stereo microscopes.
| Eyepieces | Microscope | Adapter |
|---|---|---|
| PE range | Olympus SZX7, SZX9 or SZX12 (with SZX-TR30 trinocular head) | U-SPT |
| NFK range | Olympus SZ4045 TRPT, SZ6045 TRPT or SZ1145 TRPT | SZ-PT |
| Olympus SZH | SZH-PT | |
| FK range | Olympus SZ-III-Tr | PM-ADF |
| P range | Olympus X-Tr or JM-Tr | PM-ADP |
Versions
Two versions are known, differing only in their colour. The more recent version has the main part of the adapter finished in a smooth, semi-matt cream, similar to the BH-2, CH-2, CK40 and IMT-2 microscopes. The earlier version is finished in a “hammered” medium grey, similar to the BH and CH microscopes and the grey parts of the Auto Bellows and various other OM macro equipment.
Some of the Olympus microscope literature refers to this item as the Photomicro adapter MOM-L.
CAUTION: Olympus did NOT make a version of the Adapter L with a T-mount. Modified versions of the Adapter L with a T-mount sometimes appear on eBay, but the modification increases the height of the adapter by 10 mm or more, and so the image seen by the camera will not be parfocal with the image seen through the eyepieces.
Alternatives
Richard J. Kinch makes an (Olympus 38mm Dovetail to T-mount Adapter) that maintains the proper 150.0 mm distance from the lip on which the top section of an NFK eyepiece rests to the plane of the sensor. The T-2 mount allows it to be used with many film and digital DLRs and with digital system cameras.
The PA1-10A 35mm SLR Camera Adapter from Diagnostics Instruments fits the circular dovetail on an Olympus trinocular microscope, and takes a T-2 mount at the other end; it can therefore be used with many other SLR cameras, not just Olympus.
Going digital
There are no moving or electronic connections between the Photomicro Adapter L and the Olympus OM camera body, so it is easy to adapt digital camera bodies that are less deep than the OM, and Canon EOS digital SLRs are often used. The most suitable are the EOS 5D Mark II and EOS 6D, because they have a sensor the same size as 35mm film.
Olympus OM camera bodies and the SC 35 Type 12 scientific camera have a register distance of 46 mm from the film plane to the front surface of the mount for lenses. Canon EOS digital SLRs have a corresponding distance of 44 mm, and so they need an adapter 2.0 mm thick when they are used to replace an Olympus body. It is not possible to make an adapter for Nikon F camera bodies that maintains parfocality, but replacement rear lens mounts are available.
The register distances for many other cameras can be found in Camera Mounts Sorted by Register.
- Attaching a digital SLR camera to an Olympus BH-2 microscope
- Attaching a digital SLR camera to an Olympus CH-2, CK2, CK40 or CK40M microscope
- Attaching a digital SLR camera to an Olympus BH, CH or IMT microscope
- Attaching a digital SLR camera to an Olympus SZ4045, SZ4060, SZ6045 or SZ1145 stereo microscope
Instruction booklet
Reproduced with permission from the copyright owner, Olympus Optical Co., Ltd
HOW TO USE THE PHOTOMICRO ADAPTERS L & H
As previously mentioned, the connecting units employed in the Photomicro Group can be divided into two groups, according to the total magnification. One group centering on the Photomicro Adapter L is chiefly used for total magnifications of 250× and lower; the other group, centering on the Photomicro Adapter H, for magnifications higher than 250×.
Whatever the magnification, to master photomicrographic techniques you must first become familiar with every unit. The following pages describe how to use the Photomicro Adapters L, H, Eyepiece Adapters PM-ADF, PM-ADP, PM-ADG-3 and Photomicro Stand PM-PSS.
USE OF THE ADAPTER L
• Function of the Adapter L
For photomicrography with the OM body, this adapter is used to mount a photo eyepiece on the camera. The eyepieces available for this use are the NFK (FK), P and G. Each of them requires a specific eyepiece adapter PM-ADF, PD-ADP or PM-ADG-3. For 20× objectives, with total magnification up to 250×, the Adapter L directly connects to either of these three eyepiece adapters. Note, however, that the Adapter L can be directly applied to the Olympus Universal Research Microscope VANOX, BH2 series microscopes and the Photomicrographic Stand PM-PSS for photomicrography with the OM body through the whole range of magnification.
• Use the Adapter L
1. Replace the standard Focusing Screen 1-13 with the Screen 1-12.
2. Mount the the Photomicro Adapter L to the OM body. The Adapter L is attached to the camera in the same manner as a normal interchangable lens.
3. Determine the magnification.
Picture magnification is determined by the following formula.
| Eyepiece | Picture magnification |
|---|---|
| NFK (FK) | NFK (FK) eyepiece power × objective power |
| P & G | P or G eyepiece power × objective power × approx. 0.5 |
| Photo eyepiece | Compatible microscope |
|---|---|
| NFK FK G P |
VANOX (AHB-LB), BH2 VANOX (AH) & BH Stereoscopic Microscopes Others |
4. In photomicrography, microscopes require special eyepieces FK, P or G for use with the OM body and Adapter L for low power magnification
- When either eyepiece FK or P is suitable, FK is preferable to P, since it is specially designed for photomicrography.
- Only the objective has resolving power. The eyepiece serves merely to enlarge the image resolved by the objective. For a given total magnification involving different combinations of eyepieces and objectives, the use of a higher power objective will result in finer resolution.
5. Select an eyepiece adapter suitable for the eyepiece in use.
- Eyepiece Adapter PM-ADF for Photo Eyepieces NFK (or FK)
- Eyepiece Adapter PM-ADP for Eyepieces P
- Eyepiece Adapter PM-ADG-3 for Eyepieces G
NOTE:
The VANOX (AH and BH series including AHB-LB), BH2 and PM-PSS do not require any eyepiece adapter.
6. Mount the Adapter L with camera onto the microscope.
After selection of the Eyepiece/Eyepiece Adapter combination, mount the entire camera assembly on the microscope as follows:
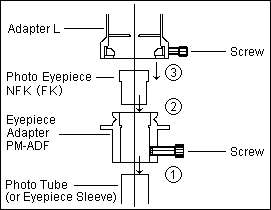
a. For Photo Eyepiece NFK (or FK)
- Attach the Eyepiece Adapter PM-ADF to the photo tube of microscope, and clamp with screw provided.
- Insert the selected Eyepiece NFK (FK) into the Eyepiece Adapter PM-ADF.
- Fit the Adapter L over the Eyepiece Adapter PM-ADF pushing all the way down, and clamp the entire camera assembly.
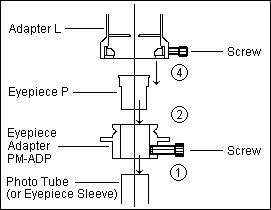
b. For Eyepiece P
- Fit the Eyepiece Adapter PM-ADP to the photo tube pushing all the way down.
- Insert the Eyepiece P into the photo tube.
- Pressing down the eyepiece against the photo tube slightly, raise the Eyepiece Adapter until it contacts with the eyepiece flange (be sure the eyepiece flange is in contact with both the photo tube and Eyepiece Adapter) and lock the adapter firmly with clamping screw.
- Fit the Adapter L over the Eyepiece Adapter pushing all the way down and clamp the entire camera assembly.
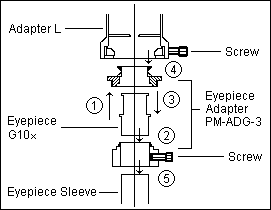
c. For Eyepiece G10×
- Unscrew the upper part of the Eyepiece Adapter PM-ADG-3.
- insert the G10× into the lower part.
- Replace the upper part of the Adapter.
- Attach the Eyepiece/Eyepiece Adapter combination to the Adapter L, and clamp.
- Insert the entire camera assembly into the microscope eyepiece sleeve pushing all the way down, and clamp.
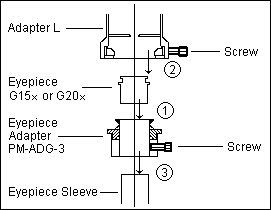
d. For Eyepieces G15× and G20×
- insert the G15× or G20× into the Adapter PM-ADG-3.
- Attach the Eyepiece Adapter PM-ADG-3 to the eyepiece sleeve, and clamp.
- Fit the Adapter L over the Eyepiece Adapter pushing all the way down, and clamp the entire camera assembly.
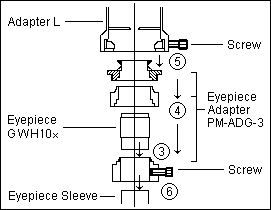
e. For Eyepieces GWH10×
- Use the intermediate ring marked with letters “GWH 10×”, provided with the PM-ADG-3.
- Unscrew the PM-ADG-3 into 3 parts.
- Insert the Eyepiece GWH10× into the lowest ring with clamping screw.
- Re-screw the other 2 rings into the lowest one.
- Place the Adapter L on the PM-ADG-3 and clamp.
- Connect the entire assembly into one of the eyepiece sleeves of the stereo microscope, and clamp.
7. Adjust the camera position.
If it is necessary to adjust the camera position, loosen the clamping screw provided on the Adapter L, rotate the camera to the desired position, and reclamp.
8. Focus.
Focusing with the OM System Focusing Screen 1-12.
- Use the Dioptric Correction Lens or the Varimagni Finder, so that the double cross hairs within the field of view can be clearly recognized as two lines; otherwise correct focus cannot be obtained.
- Adjust the coarse and fine adjustment controls of the microscope to bring the specimen into focus. Check again if both the double cross hairs and the specimen are equally sharp in focus.

9. Determine the exposure.
- For the OM-1 and OM-2 in manual operation: Rotate the shutter speed ring or adjust light intensity by means of voltage adjustment of the light source or ND filters, until the needle in the viewfinder comes to the center of index marks.
- For the OM-2 in automatic operation: You can use the automatic exposure control system built in the OM-2.
* If the subject is darker than the background, turn the exposure ring or exposure compensation ring to over-expose by one or two F stops according to the situation.
On the contrary, if the subject is brighter than the background, turn the ring to under-expose.
USE OF PHOTOMICROGRAPHIC STAND PM-PSS
To set up the microscope on the PM-PSS, as illustrated above, please read the instructions provided with the stand, and then proceed as follows:
1. Set the Focusing Screen 1-12 to the OM body.
2. Place the microscope on the base of the PM-PSS, so that the photo tube comes directly under the camera supporting arm.
3. Insert the eyepiece into the photo tube.
- For Photo Eyepiece FK
Put the light shield tube on the microscope photo tube, into which the selected Photo Eyepiece FK is inserted slowly. - For Eyepiece P
Insert the selected Eyepiece P into the photo tube without the light shield tube.
4. Looking through the camera mounting hole in the arm, let down the arm until the Eyepiece enters the hole (if necessary, adjust the microscope position so as to accurately center the Eyepiece in the hole).
5. Loosening the clamping screw provided on the Adapter L, put the Adapter L over the camera mounting hole, and clamp.
6. Lower the arm slowly until it stops (at this height, the diaphragm inside the Adapter L touches the top of the eyepiece).
Then raise the arm by about 1mm so that the Adapter L floats off to the Eyepiece. Take care not to allow the periphery of the Eyepiece or light shield tube to come into contact with the edge of the camera mounting hole. Then raise the collar to support the arm.
7. Mount the OM body on the Adapter L.
8. Focus and expose.
OLYMPUS
OLYMPUS OPTICAL CO., LTD.
43-2 Hatagaya 2-chome, Shibuya-ku, Tokyo, Japan
Send comments or questions to Alan Wood
![]()
Created 18th May 2001 – Updated 18th October 2019
Copyright © 2001–2019 Alan Wood